


A patio is only as good as what’s underneath it. Skip the concrete patio base preparation, and you’ll end up with cracks, settling, and a slab that shifts every time Southwest Florida’s rainy season rolls through. We see it constantly at CHC Concrete, homeowners in Fort Myers, Cape Coral, and surrounding areas who poured over a poorly prepped base and now need expensive repairs within just a few years.
The good news: getting the base right isn’t complicated. It takes effort, but the steps are straightforward if you know what you’re doing. This guide walks you through the full process, from clearing and excavating your site to laying and compacting your subbase materials so the finished slab has a stable, long lasting foundation. We’ll also cover the details that matter most in our region, like dealing with sandy soil and proper drainage, so your patio holds up to the conditions it’ll actually face.
Whether you’re planning to tackle this yourself or just want to understand what a proper job looks like before hiring it out, you’re in the right place. At CHC Concrete, we’ve built our reputation on doing base work the right way, no shortcuts on compaction, no skipping the gravel layer, and this guide reflects that same standard. Let’s get into it.
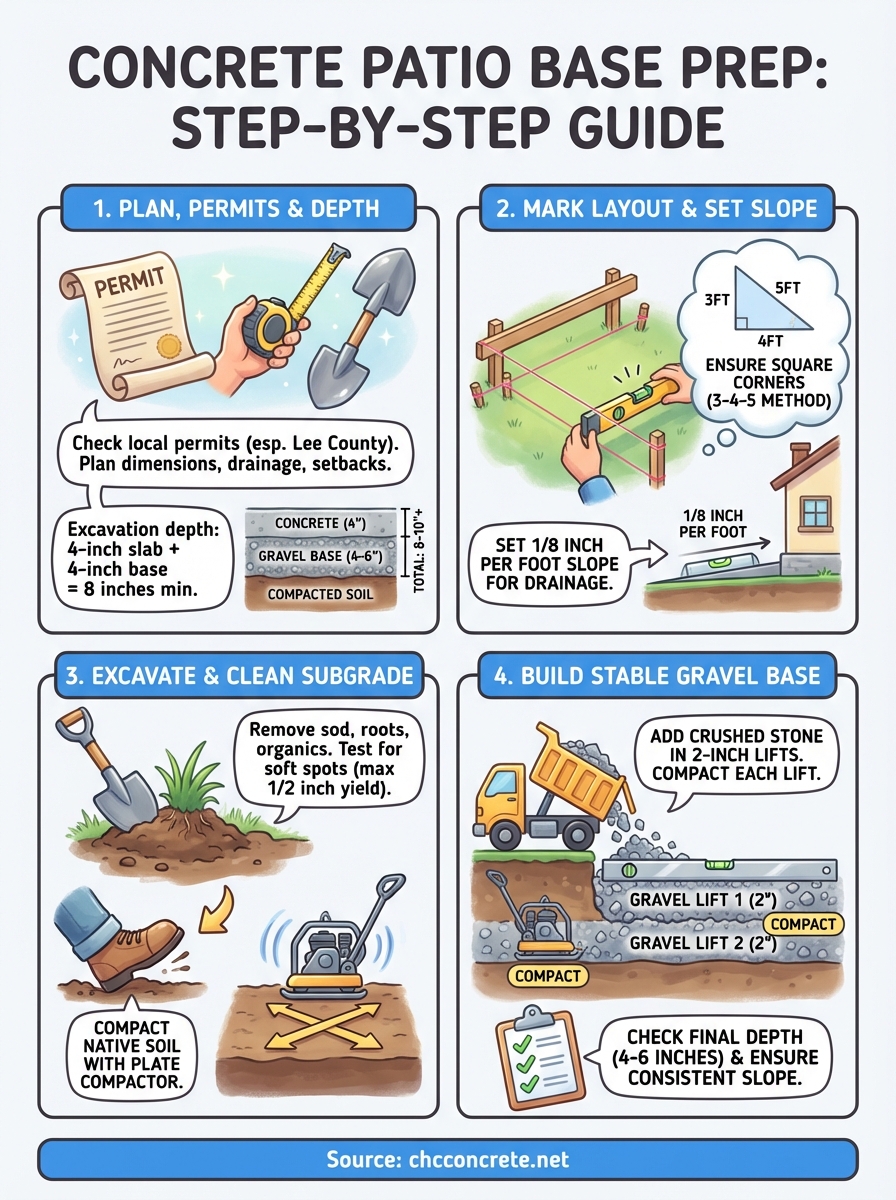
Before you start: plan, permits, and depth
Rushing into concrete patio base preparation without a plan is where most DIY projects go sideways. Before you pick up a shovel, you need to know your patio’s exact dimensions, where the water will drain, and whether your local municipality requires a permit. In Southwest Florida, Fort Myers and Cape Coral both have building requirements that can affect slab thickness, setback distances, and drainage compliance, so checking ahead saves you from tearing out work later.
Pull your permits first
Many homeowners skip this step and regret it. In Lee County and surrounding areas, a concrete patio over a certain square footage typically requires a building permit, and that threshold is lower than most people assume. Contact your local building department or check your city’s official website before you start breaking ground. Getting caught without a permit can mean fines, a stop work order, or being required to remove the slab entirely.
Unpermitted concrete work can also complicate home sales, since inspectors flag it during the buyer’s due diligence process.
Before breaking ground, confirm these details with your local building department:
- Minimum square footage that triggers a permit requirement
- Setback distances from property lines and structures
- Required inspection checkpoints during or after the pour
Determine the right excavation depth
Your excavation depth depends on two main factors: the thickness of your concrete slab and the depth of your compacted base material. For a standard residential patio, plan for a 4 inch slab plus a 4 inch compacted gravel base, which means you need to excavate at least 8 inches below your finished surface elevation. In Southwest Florida, sandy soil shifts more than denser soils in other regions, so some contractors recommend going to 6 inches of gravel base for larger slabs or areas with known drainage issues.
| Layer | Thickness |
|---|---|
| Concrete slab | 4 inches |
| Compacted gravel base | 4 to 6 inches |
| Total excavation depth | 8 to 10 inches |
Step 1. Mark layout and set the slope
Start by physically marking your patio’s footprint before any digging begins. Clear the area of furniture, plants, and debris so you have a clean, measured workspace to confirm your dimensions accurately on the ground.
Lay out your patio boundaries
Use batter boards and mason’s line to establish the exact perimeter of your slab. Drive wooden stakes about 2 feet beyond each corner, attach string lines between them, and confirm square corners using the 3-4-5 triangle method: measure 3 feet along one string, 4 feet along the other, and adjust until the diagonal reads exactly 5 feet. Mark the ground along the lines with marking paint so you have a clear excavation guide.
A layout that’s even slightly out of square will make form setting and finishing significantly harder later in the project.
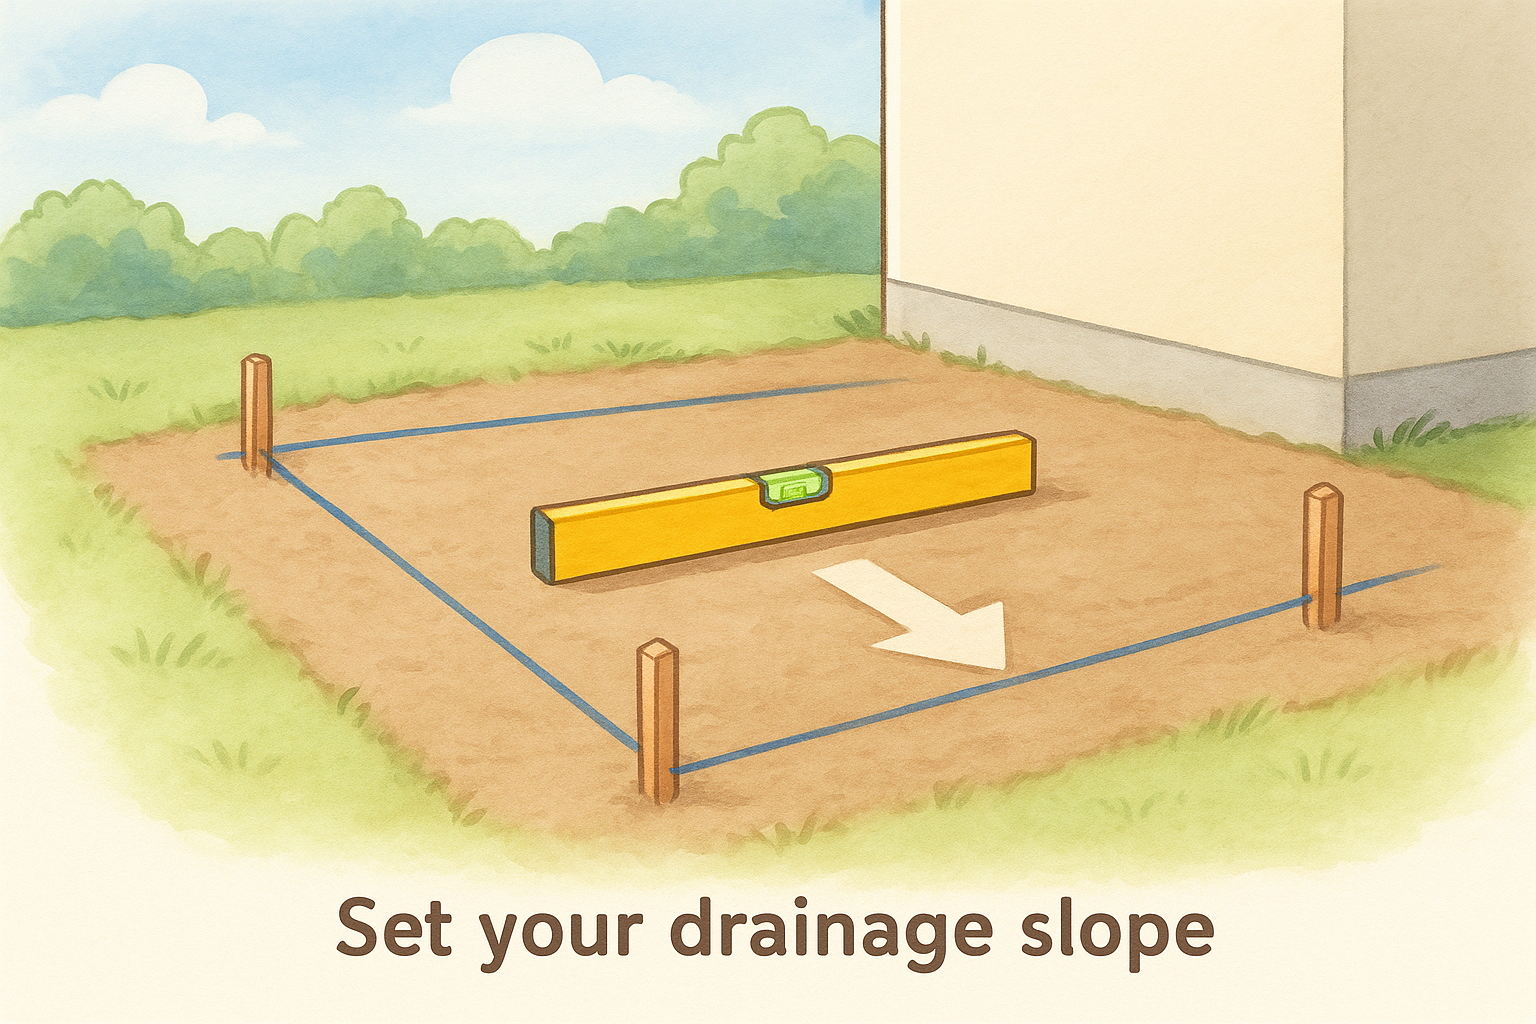
Set your drainage slope
Proper slope is one of the most critical elements of concrete patio base preparation in Southwest Florida, where heavy rainfall is routine. Your slab needs a minimum slope of 1/8 inch per foot away from your home or any adjacent structure. Use a line level on your string lines to dial in this grade now, before you dig. That slope should carry through every layer, from subgrade to finished surface.
Step 2. Excavate and clean the subgrade
With your layout marked and slope set, you’re ready to dig. Remove all sod, roots, and organic material within your marked perimeter to your full excavation depth. Organic material left in place will decompose and create voids that cause slab settlement, which is a primary reason patios crack and shift in Southwest Florida’s sandy soil.
Remove all soft spots
After excavating, walk the subgrade and press your heel firmly into the soil across the entire area. Any spot that gives more than half an inch under your weight is too soft for solid concrete patio base preparation. Dig those areas out an additional 2 to 4 inches, then backfill with clean compacted fill dirt or road base material before proceeding.
Never pour concrete over uncompacted backfill, even if it looks level on the surface.
Compact the native subgrade
Use a plate compactor to compact the subgrade once it’s clear of soft spots. Make two passes in perpendicular directions for even coverage. Follow this sequence for best results:
- Lightly mist dry soil before compacting
- Make the first pass along the length of the area
- Make the second pass perpendicular to the first
Step 3. Build a stable gravel base
With your subgrade compacted, add crushed stone or gravel to reach your target base depth of 4 to 6 inches. Pour the material in 2 inch lifts and compact each lift before adding the next. Dumping all your gravel in at once and compacting it in a single pass leaves the lower layers loose, which defeats the entire purpose of concrete patio base preparation.
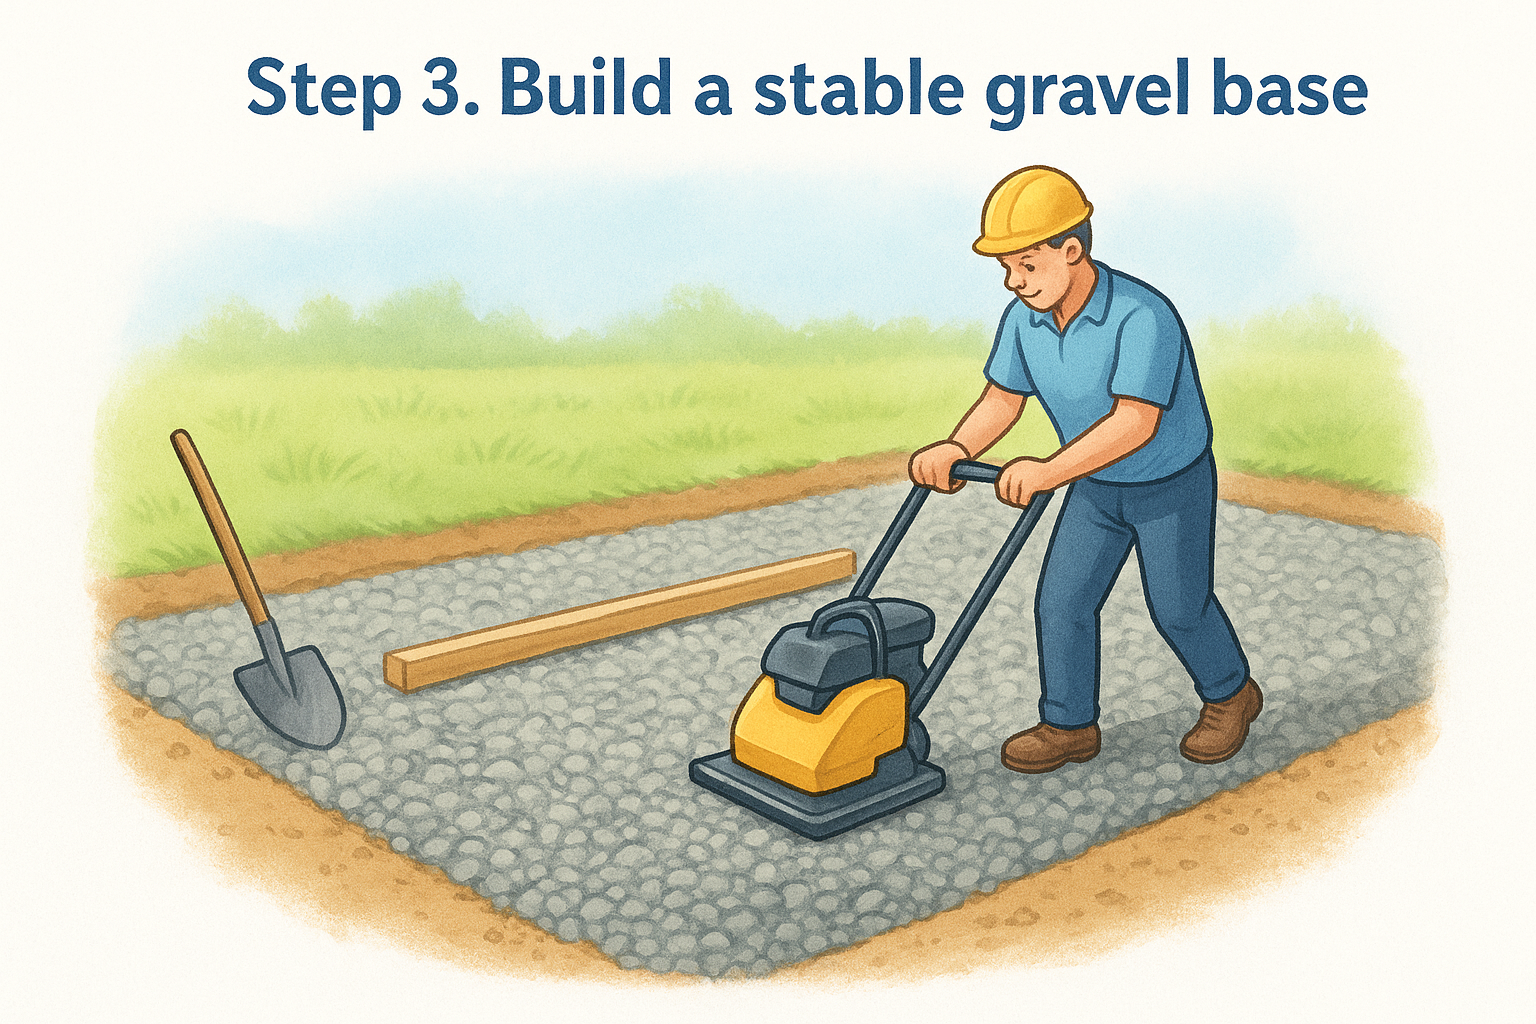
Compact each 2 inch lift separately before adding the next one, skipping this step is the fastest way to create a base that settles unevenly under the slab.
Choose the right gravel material
Crushed angular stone compacts better than rounded river rock because the irregular edges lock together under pressure. In Southwest Florida, compactible road base (also called crusher run) is widely available and performs well for patio subbase work. Avoid these materials as your primary base layer:
- Clean sand
- Rounded river rock
- Loose fill dirt
- Topsoil
Finish the gravel surface
After your final lift is compacted, use a straightedge or screed board to check for consistent depth across the entire area. Your drainage slope from Step 1 should still be present in the gravel layer.
Run through this quick checklist before moving forward:
- Depth is consistent at 4 to 6 inches across the full footprint
- No soft or loose patches remain
- Slope is maintained throughout the gravel surface
Step 4. Final checks before forms and pour
Before you set your forms and schedule the concrete truck, run through a final inspection of your entire concrete patio base preparation. Catching a problem now takes minutes to fix; catching it after the pour requires a demo saw and a full restart.
Check your grade and depth
Lay a long straightedge or screed board across the gravel surface at multiple points to confirm consistent depth throughout. Your base should hold the target slope of 1/8 inch per foot away from the house with no flat or reverse draining sections. Use a tape measure to spot check depth in at least six locations across the footprint.
If any section reads short, add gravel and compact that spot before moving on.
Run through this checklist before setting your forms:
- Depth is uniform at 4 to 6 inches across all measured points
- Slope drains away from the structure with no reverse sections
- No loose or uncompacted patches remain in the surface
Inspect for movement or soft spots
Walk the entire gravel surface one final time, pressing your weight into different areas. The base should feel solid with no give underfoot. Any section that shifts needs another compaction pass with the plate compactor.
Confirm these two final conditions before proceeding:
- Surface holds firm under your full body weight
- No visible low spots or uneven areas remain across the footprint
Ready for the pour
At this point, your concrete patio base preparation is done. You’ve excavated to the right depth, compacted your subgrade, built up a gravel base in proper lifts, and confirmed your drainage slope is consistent throughout. That work gives your slab the stable foundation it needs to hold up through years of Southwest Florida heat, rain, and soil movement without cracking or shifting.
Now you’re ready to set your forms, place your reinforcement, and schedule your concrete delivery. Take your time with form alignment before calling the truck, since the forms set the final shape and surface elevation of your finished slab. A solid base gets wasted if your forms aren’t level and properly staked.
If you’d rather hand this project off to a crew that handles the full process, from base prep to finished surface, contact the CHC Concrete team for a free on site estimate.